About EFK
When it comes to Kubernetes in production environment, logging has its important role to play. It help to understand where the problem is and what went wrong.
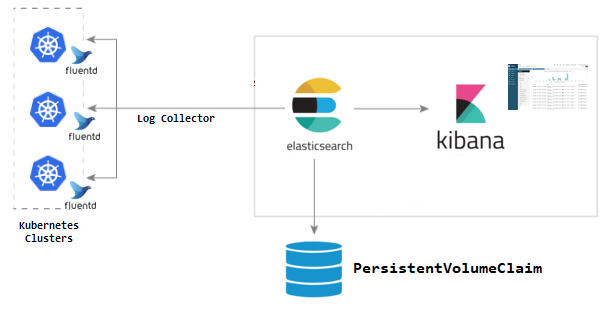
EFK is used for log streaming, log analysis, and log monitoring. It is a combination of 3 components.
1. Elasticsearch — logging backend for storing, searching and analyzing log data.
2. Fluentd — logging agent which continuously streams log data to the logging backend.
3. Kibana — A tool to visualize log data in the form of dashboards.
Here, we are using K8s cluster created using AWS EKS. It has 4 nodes with type ‘t3.medium’ and AMI ‘amazon linux 2’. Also, add-ons used while setting up the cluster were ‘kube-proxy’, ‘vpc-cni’, ‘coredns’ and ‘aws-ebs-csi-driver’.
Also, we have to create persistent volume for Elasticsearch. In that case, ‘Amazon EBS CSI driver IAM role’ need to be created. For that , please refer the AWS official documentation page:
https://docs.aws.amazon.com/eks/latest/userguide/csi-iam-role.html
(You may skip step 11 if KMS Key Encryption is not required).
After setting up the EKS cluster, ssh to the Bastion host and install aws cli version 2. Configure the AWS credentials and add the access key ID and secret key using,
aws configure
Add the cluster as a new context using the following command.
aws eks — region=<region> update-kubeconfig — name <cluster_name>
eg:
aws eks — region=us-east-1 update-kubeconfig — name eks-cluster
Added new context arn:aws:eks:us-east-1:103423222380:cluster/eks-cluster to /root/.kube/config
Install kubectl so that we can manage out cluster from the Bastion host.
kubectl get nodes
NAME STATUS ROLES AGE VERSION
ip-10–0–129–220.ec2.internal Ready <none> 27m v1.24.10-eks-48e63af
ip-10–0–149–55.ec2.internal Ready <none> 26m v1.24.10-eks-48e63af
ip-10–0–190–100.ec2.internal Ready <none> 30m v1.24.10-eks-48e63af
ip-10–0–226–108.ec2.internal Ready <none> 30m v1.24.10-eks-48e63af
Setup EFK Stack
Elasticsearch as a Statefulset
Elasticsearch is deployed as a Statefulset and the multiple replicas connect with each other using a headless service (svc). The headless svc helps in the DNS domain of the pods.
The statefulset creates the Persistent Volume Claim (PVC) with the default available storage class. If you have a custom storage class for PVC, you can add it in the volumeClaimTemplates by uncommenting the storageClassName parameter.
Following are the manifests for statefulset and service.
apiVersion: apps/v1

kind: StatefulSet

metadata:

  name: es-cluster

spec:

  serviceName: elasticsearch

  replicas: 3

  selector:

    matchLabels:

      app: elasticsearch

  template:

    metadata:

      labels:

        app: elasticsearch

    spec:

      containers:

      - name: elasticsearch

        image: docker.elastic.co/elasticsearch/elasticsearch:7.5.0

        resources:

            limits:

              cpu: 1000m

            requests:

              cpu: 100m

        ports:

        - containerPort: 9200

          name: rest

          protocol: TCP

        - containerPort: 9300

          name: inter-node

          protocol: TCP

        volumeMounts:

        - name: data

          mountPath: /usr/share/elasticsearch/data

        env:

          - name: cluster.name

            value: k8s-logs

          - name: node.name

            valueFrom:

              fieldRef:

                fieldPath: metadata.name

          - name: discovery.seed_hosts

            value: "es-cluster-0.elasticsearch,es-cluster-1.elasticsearch,es-cluster-2.elasticsearch"

          - name: cluster.initial_master_nodes

            value: "es-cluster-0,es-cluster-1,es-cluster-2"

          - name: ES_JAVA_OPTS

            value: "-Xms512m -Xmx512m"

      initContainers:

      - name: fix-permissions

        image: busybox

        command: ["sh", "-c", "chown -R 1000:1000 /usr/share/elasticsearch/data"]

        securityContext:

          privileged: true

        volumeMounts:

        - name: data

          mountPath: /usr/share/elasticsearch/data

      - name: increase-vm-max-map

        image: busybox

        command: ["sysctl", "-w", "vm.max_map_count=262144"]

        securityContext:

          privileged: true

      - name: increase-fd-ulimit

        image: busybox

        command: ["sh", "-c", "ulimit -n 65536"]

        securityContext:

          privileged: true

  volumeClaimTemplates:

  - metadata:

      name: data

      labels:

        app: elasticsearch

    spec:

      accessModes: [ "ReadWriteOnce" ]

      # storageClassName: ""

      resources:

        requests:

          storage: 3Gi
kubectl create -f es-sts.yaml
apiVersion: v1

kind: Service

metadata:

  name: elasticsearch

  labels:

    app: elasticsearch

spec:

  selector:

    app: elasticsearch

  clusterIP: None

  ports:

    - port: 9200

      name: rest

    - port: 9300

      name: inter-node
kubectl create -f es-svc.yaml
You can check the PVC status using,
kubectl get pvc

NAME STATUS VOLUME CAPACITY ACCESS MODES STORAGECLASS AGE
data-es-cluster-0 Bound pvc-fefd5503–72e9–48ed-8ebb-053c45fe372f 3Gi RWO gp2 24h
data-es-cluster-1 Bound pvc-a3c272a1–7135–40dc-a188–87fdf1804550 3Gi RWO gp2 24h
data-es-cluster-2 Bound pvc-837d2edb-159a-4de1–8d14–5b8fbdb67237 3Gi RWO gp2 24h

Once the Elasticsearch pods come into running status,
kubectl get pods
NAME READY STATUS RESTARTS AGE
es-cluster-0 1/1 Running 0 20h
es-cluster-1 1/1 Running 0 20h
es-cluster-2 1/1 Running 0 20h
Port-forward it using,
kubectl port-forward es-cluster-0 9200:9200
To check the health of the Elasticsearch cluster, run the following command in the terminal which will give an output as shown.
curl http://localhost:9200/_cluster/health/?pretty
{
"cluster_name" : "k8s-logs",
"status" : "green",
"timed_out" : false,
"number_of_nodes" : 3,
"number_of_data_nodes" : 3,
"active_primary_shards" : 0,
"active_shards" : 0,
"relocating_shards" : 0,
"initializing_shards" : 0,
"unassigned_shards" : 0,
"delayed_unassigned_shards" : 0,
"number_of_pending_tasks" : 0,
"number_of_in_flight_fetch" : 0,
"task_max_waiting_in_queue_millis" : 0,
"active_shards_percent_as_number" : 100.0
}
Kibana Deployment & Service
Create the Kibana deployment manifest as kibana-deployment.yaml.
apiVersion: apps/v1

kind: Deployment

metadata:

  name: kibana

  labels:

    app: kibana

spec:

  replicas: 1

  selector:

    matchLabels:

      app: kibana

  template:

    metadata:

      labels:

        app: kibana

    spec:

      containers:

      - name: kibana

        image: docker.elastic.co/kibana/kibana:7.5.0

        resources:

          limits:

            cpu: 1000m

          requests:

            cpu: 100m

        env:

          - name: ELASTICSEARCH_URL

            value: http://elasticsearch:9200

        ports:

        - containerPort: 5601
Create the manifest using,
kubectl create -f kibana-deployment.yaml
Here, we are using a service type ‘LoadBalancer’ to access the Kibana UI.
apiVersion: v1

kind: Service

metadata:

  name: kibana-np

spec:

  selector:

    app: kibana

  type: LoadBalancer

  ports:

    - port: 8080

      targetPort: 5601
Create the kibana-svc now.
kubectl create -f kibana-svc.yaml
Check if the kibana deployment and pod are running using,
kubectl get deployment
NAME READY UP-TO-DATE AVAILABLE AGE
kibana 1/1 1 1 24h


kubectl get pods
NAME READY STATUS RESTARTS AGE
es-cluster-0 1/1 Running 0 24h
es-cluster-1 1/1 Running 0 24h
es-cluster-2 1/1 Running 0 24h
kibana-6db5f8d7c8-zxjtf 1/1 Running 0 3h30m
Create the kibana-svc now.
kubectl create -f kibana-svc.yaml
Check if the kibana deployment and pod are running using,
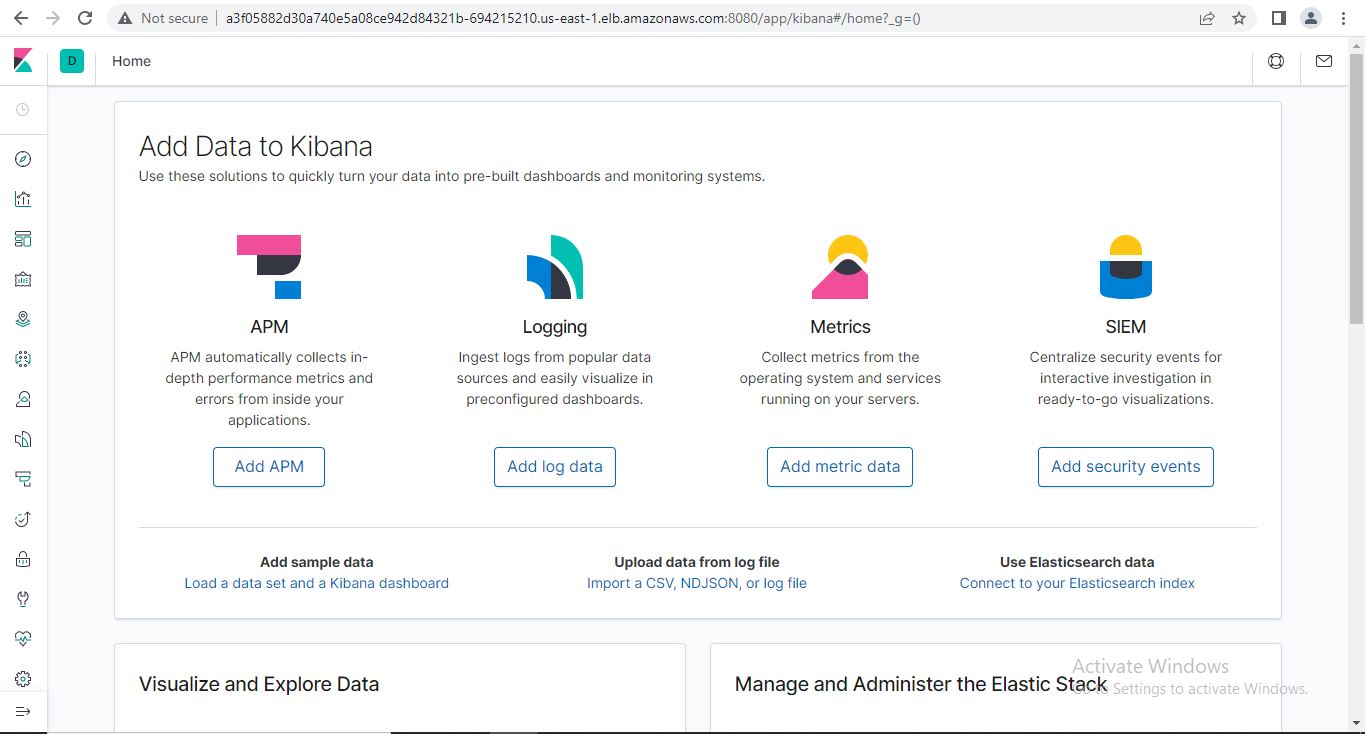
Check using the load balancer endpoint,
curl http://a3f05882d30a740e5a08ce942d84321b-694215210.us-east-1.elb.amazonaws.com:8080/app/kibana
Fluentd Daemon set
For Fluentd, we require a ClusterRole, to give permissions for pods and namespaces.
Create a manifest fluentd-role.yaml
apiVersion: rbac.authorization.k8s.io/v1

kind: ClusterRole

metadata:

  name: fluentd

  labels:

    app: fluentd

rules:

- apiGroups:

  - ""

  resources:

  - pods

  - namespaces

  verbs:

  - get

  - list

  - watch
Apply the manifest
kubectl create -f fluentd-role.yaml
Next, is the service account fluentd-sa.yaml.
apiVersion: v1

kind: ServiceAccount

metadata:

  name: fluentd

  labels:

    app: fluentd
Apply the manifest
kubectl create -f fluentd-sa.yaml
Now, we have to bind the role with service account. Create a manifest fluentd-rb.yaml.
kind: ClusterRoleBinding

apiVersion: rbac.authorization.k8s.io/v1

metadata:

  name: fluentd

roleRef:

  kind: ClusterRole

  name: fluentd

  apiGroup: rbac.authorization.k8s.io

subjects:

- kind: ServiceAccount

  name: fluentd

  namespace: default
Apply the manifest
kubectl create -f fluentd-rb.yaml
We are deploying fluentd as a daemon set so that it runs in all the nodes and collect the container logs. Create fluentd-ds.yaml.
apiVersion: apps/v1

kind: DaemonSet

metadata:

  name: fluentd

  labels:

    app: fluentd

spec:

  selector:

    matchLabels:

      app: fluentd

  template:

    metadata:

      labels:

        app: fluentd

    spec:

      serviceAccount: fluentd

      serviceAccountName: fluentd

      containers:

      - name: fluentd

        image: fluent/fluentd-kubernetes-daemonset:v1.4.2-debian-elasticsearch-1.1

        env:

          - name:  FLUENT_ELASTICSEARCH_HOST

            value: "elasticsearch.default.svc.cluster.local"

          - name:  FLUENT_ELASTICSEARCH_PORT

            value: "9200"

          - name: FLUENT_ELASTICSEARCH_SCHEME

            value: "http"

          - name: FLUENTD_SYSTEMD_CONF

            value: disable

        resources:

          limits:

            memory: 512Mi

          requests:

            cpu: 100m

            memory: 200Mi

        volumeMounts:

        - name: varlog

          mountPath: /var/log

        - name: varlibdockercontainers

          mountPath: /var/lib/docker/containers

          readOnly: true

      terminationGracePeriodSeconds: 30

      volumes:

      - name: varlog

        hostPath:

          path: /var/log

      - name: varlibdockercontainers

        hostPath:

          path: /var/lib/docker/containers
Apply the fluentd manifest
kubectl create -f fluentd-ds.yaml
kubectl get pods
NAME READY STATUS RESTARTS AGE
es-cluster-0 1/1 Running 0 24h
es-cluster-1 1/1 Running 0 24h
es-cluster-2 1/1 Running 0 24h
fluentd-d49sw 1/1 Running 0 3h30m
fluentd-pkh2l 1/1 Running 0 3h30m
fluentd-qd6f6 1/1 Running 0 3h31m
fluentd-rvdvx 1/1 Running 0 3h30m
kibana-6db5f8d7c8-zxjtf 1/1 Running 0 3h30m
Now, the EFK setup is completed.
Test Pod
Save the following as test-pod.yaml
apiVersion: v1

kind: Pod

metadata:

  name: counter

spec:

  containers:

  - name: count

    image: busybox

    args: [/bin/sh, -c,'i=0; while true; do echo "Thanks for visiting devopscube! $i"; i=$((i+1)); sleep 1; done']
Apply the manifest
kubectl create -f test-pod.yaml
Kibana Dashboard
Access the Kibana dashboard using the load balancer endpoint along with post 8080.
Click on the management icon at the bottom left corner of the page. There, under Kibana, select the option ‘Index Patterns’.
Create a new Index Patten using the pattern — “logstash-*”, click next and select “@timestamp” in the timestamps option. Create index pattern.
Move to the console option at the top left of the page where you can see the logs from our test pod.


