Deploying a Serverless Laravel Application in AWS using Bref

Serverless deployment is a new service that AWS is offering to help face the challenge of scaling applications, expenses etc. Developers who want to decrease their go-to-market time and build lightweight, flexible applications that can be expanded or updated quickly, benefit greatly from serverless computing. It offers greater scalability, more flexibility, and quicker time to release, all at a reduced cost.

Advantages:

  • No server management is necessary
  • Only charged for the server space they use
  • Scalable
  • Quick deployments and updates are possible
  • Low latency

Disadvantages:

  • Testing are debugging become difficult
  • Security concerns
  • Serverless architectures are not built for long running processes
  • Performance may be affected

Environments used:

  • Linux machine
  • AWS IAM user
  • PHP
  • Composer

You can place the directory containing the application file in whichever location.

  1. Create an AWS account. Then, create an IAM user with programmatic access and get the access key ID and secret access key.
  2. Ensure that the php extensions curl and xml are enabled. You can check using the following command.
php -m | grep xml

php -m | grep curl

If not enabled, install using the command,

sudo apt-get install php-xml

sudo apt-get install php-curl

Enable them in the file ‘/etc/php/8.1/cli/php.ini’ and restart apache using ‘service apache2 restart’

  1. Now, we have to install and configure the serverless framework as a global dependency.
npm install -g serverless

Now, we have to add the AWS IAM user credentials using the following commad.

serverless config credentials --provider aws –key <key>  --secret <secret>
  1. Install the latest version of Laravel and also create new project in it.
composer global require laravel/installer

Get the path and add it to the PATH variable.

composer global config bin-dir –absolute
/root/.config/composer/vendor/bin (This is the path I obtained). Add it using the below command.
echo 'export PATH="$PATH:/root/.config/composer/vendor/bin"' >> ~/.bashrc

Now, check the laravel version using,

laravel --version

Laravel Installer 4.5.0
  1. To create new app,
laravel new serverless-app

To have Bref configured with Laravel we also need to install the laravel-bridge component.

composer require bref/bref bref/laravel-bridge --with-all-dependencies
  1. Now, we have to create a serverless.yaml file.
php artisan vendor:publish --tag=serverless-config

Following is its contents.


service: laravel                                                                                                                                                                                          

provider:

    name: aws

    # The AWS region in which to deploy (us-east-1 is the default)

    region: us-east-1

    # The stage of the application, e.g. dev, production, staging… ('dev' is the default)

    stage: dev

    runtime: provided.al2

package:

    # Directories to exclude from deployment

    exclude:

        - node_modules/**

        - public/storage

        - resources/assets/**

        - storage/**

        - tests/**

functions:

    # This function runs the Laravel website/API

    web:

        handler: public/index.php

        timeout: 28 # in seconds (API Gateway has a timeout of 29 seconds)

        layers:

            - ${bref:layer.php-74-fpm}

        events:

            -   httpApi: '*'

    # This function lets us run artisan commands in Lambda

    artisan:

        handler: artisan

        timeout: 120 # in seconds

        layers:

            - ${bref:layer.php-74} # PHP

            - ${bref:layer.console} # The "console" layer

plugins:

    # We need to include the Bref plugin

    - ./vendor/bref/bref


  1. Before deploying, we need to clear any configuration change generated on our machine.
php artisan config:cache

php artisan config:clear
  1. In case if your application requires database, you can deploy it in a server or in AWS RDS.
  2. Next we need to change the location of compiled view and a few other things like changing session driver to cookie and log channel to standard error in environment (.env) file.

Open .env file and add following:

CACHE_DRIVER =array
VIEW_COMPILED_PATH =/tmp/storage/framework/views 
SESSION_DRIVER =array 
LOG_CHANNEL =stderr
  1. Next we need to make changes in app service provider so that if compiled view directory is not present then it should recreate it automatically.

So copy and paste below section in boot method of app/Providers/AppServiceProvider.php

public function boot()
{
// Make sure the directory for compiled views exist
if (! is_dir(config('view.compiled'))) {
mkdir(config('view.compiled'), 0755, true);
}
}

11. After that, we’re ready to deploy.

serverless deploy

Deploying a Spring Boot microservice using Helm charts

In this blog,we explain the steps to deploy a Spring Boot microservice using Helm Charts.First we will build a docker image using a Docker file.This docker image is pushed to a repository.Then we will use Helm Charts to deploy our application to a Kubernetes cluster.An Nginx Ingress Controller is configured to expose our application to the outside world and manage traffic flow in a more flexible and scalable way.

Java Spring Boot is an open-source tool that makes it easier to use Java-based frameworks to create microservices and web apps.

Managing kubernetes cluster consists of checking cluster, pods, nodes, application deployment, replicas, load-balancer etc is a hectic task.So inorder to manage a Kubernetes cluster more efficiently and easily, one can use a package manager like Helm. Helm provides several advantages for managing Kubernetes applications,including:

  1. Simplified Deployment: With Helm, you can easily package and deploy complex applications with a single command, reducing the need for manual configuration and deployment steps.
  2. Version Control: Helm allows you to manage and track the version history of your Kubernetes applications, making it easier to roll back to previous versions in case of issues or bugs.
  3. Modular Architecture: Helm uses a modular architecture that allows you to break down your applications into smaller, reusable components that can be easily deployed and managed.

Overall, Helm provides a powerful and flexible solution for managing Kubernetes applications, making it easier to deploy, manage, and scale complex applications on Kubernetes clusters.

Prerequisites:
Docker Instance : To build the spring boot docker image and push to repository

Docker Hub Account/Any other Repository service for Docker Images

Basic Git Commands

Kubernetes Cluster: We used AWS’s EKS cluster.Bastion Host configured to manage K8’s.

First,let’s login to Docker Instance and build a docker image for our sample spring boot application.Clone the Sample Spring Boot Application : https://github.com/Keyshelltechs/sample_spring_boot

DockerFile

FROM maven:3.8.5-openjdk-18-slim AS build

WORKDIR /usr/src/app

COPY . /usr/src/app

RUN mvn package

FROM openjdk:18-jdk-slim

EXPOSE 8080

ARG JAR_FILE=spring-boot-ecs.jar

WORKDIR /opt/app

COPY --from=build /usr/src/app/target/${JAR_FILE} /opt/app/

ENTRYPOINT ["java","-jar","spring-boot-ecs.jar"] In this Dockerfile we use Multi-Stage build for creating a jar file in the first build and copying that jar file in the second build.

Let’s login to our Docker Hub Account.

$ docker login

Now let’s build the docker image using the docker command:

$ docker build -t keyshelltechs/sample_spring_boot:latest .

Here ‘keyshelltechs’ is my dockerhub’s username and ‘sample_spring_boot’ is the repository name and ‘latest’ is the tag.

Now let’s push this image to our Docker Hub repository using this command:

$ docker push keyshelltechs/sample_spring_boot:latest

Now let’s install Helm in our Bastion Host.I’m using Amazon Linux 2 for my Bastion Host.

$ curl https://raw.githubusercontent.com/helm/helm/master/scripts/get-helm-3 > get_helm.sh

$ chmod 700 get_helm.sh

$ ./get_helm.sh

You can refer to this link for helm installation : https://docs.aws.amazon.com/eks/latest/userguide/helm.html

To check helm version : $ helm version


After the helm is installed,let’s install Ingress Controller using Helm charts.

For that, first we have to add the Helm Repository :

$ helm repo add nginx-stable https://helm.nginx.com/stable

Now update the repository for ensuring that you have access to the latest versions of Helm charts and managing the repositories from which you install charts. 

$ helm repo update

Now let’s install the chart from the repository:

$ helm install my-release nginx-stable/nginx-ingress

You can refer to this link for Ingress Controller installation :

https://docs.nginx.com/nginx-ingress-controller/installation/installation-with-helm

Now let’s check whether this ingress controller is working or not.
For that, let’s check our K8’s pods and services.

$ kubectl get pods
$ kubectl get svc

We can get the External IP of our ingress controller from $ kubectl get svc


Now,let’s create the helm chart for our spring boot application.

$ helm create springboot

Here “springboot” is custom name given by us.This will create basic Helm Chart skeleton with the name springboot.

Run the following command to see the tree structure of our Springboot Helm Chart:

$ tree springboot

Of these files,we have to edit Chart.yaml,values.yaml & deployment.yaml

Chart.yaml

apiVersion: v2

name: springboot

description: A Helm chart for Kubernetes

type: application

version: 0.1.0

appVersion: "latest"

Here keep in mind that “appVersion” should be the tag which you are using for the Docker image.

values.yaml

In a Helm chart, values.yaml is a file that allows users to customize the deployment of the chart. It contains a set of key-value pairs that define the configuration settings for the chart. These values can be used to override the default configuration settings defined in the chart’s templates.

replicaCount: 3

image:

 repository: keyshelltechs/sample_spring_boot

 pullPolicy: Always

imagePullSecrets: []

nameOverride: ""

fullnameOverride: "springboot"

serviceAccount

 create: true 

 name: "springboot"

podAnnotations: {}

podSecurityContext: {}

securityContext: {}

service:

 type: ClusterIP

 port: 80

 targetPort: 8080

ingress:

 enabled: true

 annotations:

   kubernetes.io/ingress.class: nginx

   kubernetes.io/tls-acme: "true"

 hosts:

   - host: External_IP_of_ingress_controller

     paths:

     - path: /

       pathType: Prefix

       backend:

         serviceName: springboot-starterkit-svc

         servicePort: 80

 tls: []

resources: {}

autoscaling:

 enabled: false

 minReplicas: 1

 maxReplicas: 100

 targetCPUUtilizationPercentage: 80

nodeSelector: {}

tolerations: []

affinity: {}

Image’s repository value as  keyshelltechs/sample_spring_boot (without tag) which is the name of the image we have pushed earlier.Tag for this image is mentioned in Chart.yaml file.

Ingress is enabled here and we should replace External_IP_of_ingress_controller with External IP of our ingress controller which we have obtained in the earlier step.

deployment.yaml

In a Helm chart, deployment.yaml is a file that defines the Kubernetes Deployment resource used to manage the deployment of an application.

The deployment.yaml file defines the desired state of the Kubernetes Deployment resource. It specifies the containers and other resources that make up the application.This file can be customized using the values provided in the values.yaml file to enable parameterized deployment.

     containers:

       - name: {{ .Chart.Name }}

         securityContext:

           {{- toYaml .Values.securityContext | nindent 12 }}

         image: "{{ .Values.image.repository }}:{{ .Values.image.tag | default .Chart.AppVersion }}"

         imagePullPolicy: {{ .Values.image.pullPolicy }}

         ports:

           - name: http

             containerPort: {{ .Values.service.targetPort }}

             protocol: TCP

         livenessProbe:

           httpGet:

             path: /

             port: http

         readinessProbe:

           httpGet:

             path: /

             port: http

         resources:

           {{- toYaml .Values.resources | nindent 12 }}

In this file we have only edited the container: portion.


Now let’s run the install command.

Make sure you are in the parent directory of our ‘springboot’ folder to run this command.

$ helm install your-release-name springboot

Here you can give your custom release name instead of ‘your-release-name’ and ‘springboot’ is our folder which was created during the earlier step.

If everything goes right we can see release notes of the helm deployment.

Also check all our pods are running by :

$ kubectl get pods

We can access our site through this URL.

You can also refer our repo by :

$ helm repo add keyshell http://keyshelltechs.github.io/sample_helm_charts/charts

(github link : https://github.com/Keyshelltechs/sample_helm_charts)


To fetch the chart use:

$ helm fetch keyshell/springboot


Thanks for reading. Happy Helming.

If you have any queries contact us at 📲 +91-81295 71359 or email us at support@keyshell.net

Setup EFK Stack on Amazon EKS cluster

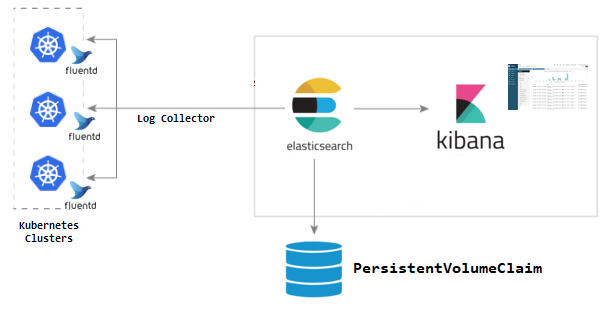
About EFK

kubectl get nodes
NAME STATUS ROLES AGE VERSION
ip-100129220.ec2.internal Ready <none> 27m v1.24.10-eks-48e63af
ip-10014955.ec2.internal Ready <none> 26m v1.24.10-eks-48e63af
ip-100190100.ec2.internal Ready <none> 30m v1.24.10-eks-48e63af
ip-100226108.ec2.internal Ready <none> 30m v1.24.10-eks-48e63af

Setup EFK Stack

Elasticsearch as a Statefulset

apiVersion: apps/v1

kind: StatefulSet

metadata:

  name: es-cluster

spec:

  serviceName: elasticsearch

  replicas: 3

  selector:

    matchLabels:

      app: elasticsearch

  template:

    metadata:

      labels:

        app: elasticsearch

    spec:

      containers:

      - name: elasticsearch

        image: docker.elastic.co/elasticsearch/elasticsearch:7.5.0

        resources:

            limits:

              cpu: 1000m

            requests:

              cpu: 100m

        ports:

        - containerPort: 9200

          name: rest

          protocol: TCP

        - containerPort: 9300

          name: inter-node

          protocol: TCP

        volumeMounts:

        - name: data

          mountPath: /usr/share/elasticsearch/data

        env:

          - name: cluster.name

            value: k8s-logs

          - name: node.name

            valueFrom:

              fieldRef:

                fieldPath: metadata.name

          - name: discovery.seed_hosts

            value: "es-cluster-0.elasticsearch,es-cluster-1.elasticsearch,es-cluster-2.elasticsearch"

          - name: cluster.initial_master_nodes

            value: "es-cluster-0,es-cluster-1,es-cluster-2"

          - name: ES_JAVA_OPTS

            value: "-Xms512m -Xmx512m"

      initContainers:

      - name: fix-permissions

        image: busybox

        command: ["sh", "-c", "chown -R 1000:1000 /usr/share/elasticsearch/data"]

        securityContext:

          privileged: true

        volumeMounts:

        - name: data

          mountPath: /usr/share/elasticsearch/data

      - name: increase-vm-max-map

        image: busybox

        command: ["sysctl", "-w", "vm.max_map_count=262144"]

        securityContext:

          privileged: true

      - name: increase-fd-ulimit

        image: busybox

        command: ["sh", "-c", "ulimit -n 65536"]

        securityContext:

          privileged: true

  volumeClaimTemplates:

  - metadata:

      name: data

      labels:

        app: elasticsearch

    spec:

      accessModes: [ "ReadWriteOnce" ]

      # storageClassName: ""

      resources:

        requests:

          storage: 3Gi

kubectl create -f es-sts.yaml


apiVersion: v1

kind: Service

metadata:

  name: elasticsearch

  labels:

    app: elasticsearch

spec:

  selector:

    app: elasticsearch

  clusterIP: None

  ports:

    - port: 9200

      name: rest

    - port: 9300

      name: inter-node

kubectl create -f es-svc.yaml


You can check the PVC status using,

kubectl get pvc

NAME STATUS VOLUME CAPACITY ACCESS MODES STORAGECLASS AGE
data-es-cluster-0 Bound pvc-fefd5503–72e9–48ed-8ebb-053c45fe372f 3Gi RWO gp2 24h
data-es-cluster-1 Bound pvc-a3c272a1–7135–40dc-a188–87fdf1804550 3Gi RWO gp2 24h
data-es-cluster-2 Bound pvc-837d2edb-159a-4de1–8d14–5b8fbdb67237 3Gi RWO gp2 24h

Once the Elasticsearch pods come into running status,
kubectl get pods
NAME READY STATUS RESTARTS AGE
es-cluster-0 1/1 Running 0 20h
es-cluster-1 1/1 Running 0 20h
es-cluster-2 1/1 Running 0 20h

{
"cluster_name" : "k8s-logs",
"status" : "green",
"timed_out" : false,
"number_of_nodes" : 3,
"number_of_data_nodes" : 3,
"active_primary_shards" : 0,
"active_shards" : 0,
"relocating_shards" : 0,
"initializing_shards" : 0,
"unassigned_shards" : 0,
"delayed_unassigned_shards" : 0,
"number_of_pending_tasks" : 0,
"number_of_in_flight_fetch" : 0,
"task_max_waiting_in_queue_millis" : 0,
"active_shards_percent_as_number" : 100.0
}

Kibana Deployment & Service

apiVersion: apps/v1

kind: Deployment

metadata:

  name: kibana

  labels:

    app: kibana

spec:

  replicas: 1

  selector:

    matchLabels:

      app: kibana

  template:

    metadata:

      labels:

        app: kibana

    spec:

      containers:

      - name: kibana

        image: docker.elastic.co/kibana/kibana:7.5.0

        resources:

          limits:

            cpu: 1000m

          requests:

            cpu: 100m

        env:

          - name: ELASTICSEARCH_URL

            value: http://elasticsearch:9200

        ports:

        - containerPort: 5601
apiVersion: v1

kind: Service

metadata:

  name: kibana-np

spec:

  selector:

    app: kibana

  type: LoadBalancer

  ports:

    - port: 8080

      targetPort: 5601
kubectl get deployment
NAME READY UP-TO-DATE AVAILABLE AGE
kibana 1/1 1 1 24h


kubectl get pods
NAME READY STATUS RESTARTS AGE
es-cluster-0 1/1 Running 0 24h
es-cluster-1 1/1 Running 0 24h
es-cluster-2 1/1 Running 0 24h
kibana-6db5f8d7c8-zxjtf 1/1 Running 0 3h30m

Create the kibana-svc now.

kubectl create -f kibana-svc.yaml

Check if the kibana deployment and pod are running using,

Fluentd Daemon set

apiVersion: rbac.authorization.k8s.io/v1

kind: ClusterRole

metadata:

  name: fluentd

  labels:

    app: fluentd

rules:

- apiGroups:

  - ""

  resources:

  - pods

  - namespaces

  verbs:

  - get

  - list

  - watch

Apply the manifest

kubectl create -f fluentd-role.yaml

Next, is the service account fluentd-sa.yaml.

apiVersion: v1

kind: ServiceAccount

metadata:

  name: fluentd

  labels:

    app: fluentd

kind: ClusterRoleBinding

apiVersion: rbac.authorization.k8s.io/v1

metadata:

  name: fluentd

roleRef:

  kind: ClusterRole

  name: fluentd

  apiGroup: rbac.authorization.k8s.io

subjects:

- kind: ServiceAccount

  name: fluentd

  namespace: default


apiVersion: apps/v1

kind: DaemonSet

metadata:

  name: fluentd

  labels:

    app: fluentd

spec:

  selector:

    matchLabels:

      app: fluentd

  template:

    metadata:

      labels:

        app: fluentd

    spec:

      serviceAccount: fluentd

      serviceAccountName: fluentd

      containers:

      - name: fluentd

        image: fluent/fluentd-kubernetes-daemonset:v1.4.2-debian-elasticsearch-1.1

        env:

          - name:  FLUENT_ELASTICSEARCH_HOST

            value: "elasticsearch.default.svc.cluster.local"

          - name:  FLUENT_ELASTICSEARCH_PORT

            value: "9200"

          - name: FLUENT_ELASTICSEARCH_SCHEME

            value: "http"

          - name: FLUENTD_SYSTEMD_CONF

            value: disable

        resources:

          limits:

            memory: 512Mi

          requests:

            cpu: 100m

            memory: 200Mi

        volumeMounts:

        - name: varlog

          mountPath: /var/log

        - name: varlibdockercontainers

          mountPath: /var/lib/docker/containers

          readOnly: true

      terminationGracePeriodSeconds: 30

      volumes:

      - name: varlog

        hostPath:

          path: /var/log

      - name: varlibdockercontainers

        hostPath:

          path: /var/lib/docker/containers
kubectl get pods
NAME READY STATUS RESTARTS AGE
es-cluster-0 1/1 Running 0 24h
es-cluster-1 1/1 Running 0 24h
es-cluster-2 1/1 Running 0 24h
fluentd-d49sw 1/1 Running 0 3h30m
fluentd-pkh2l 1/1 Running 0 3h30m
fluentd-qd6f6 1/1 Running 0 3h31m
fluentd-rvdvx 1/1 Running 0 3h30m
kibana-6db5f8d7c8-zxjtf 1/1 Running 0 3h30m

Test Pod

apiVersion: v1

kind: Pod

metadata:

  name: counter

spec:

  containers:

  - name: count

    image: busybox

    args: [/bin/sh, -c,'i=0; while true; do echo "Thanks for visiting devopscube! $i"; i=$((i+1)); sleep 1; done']

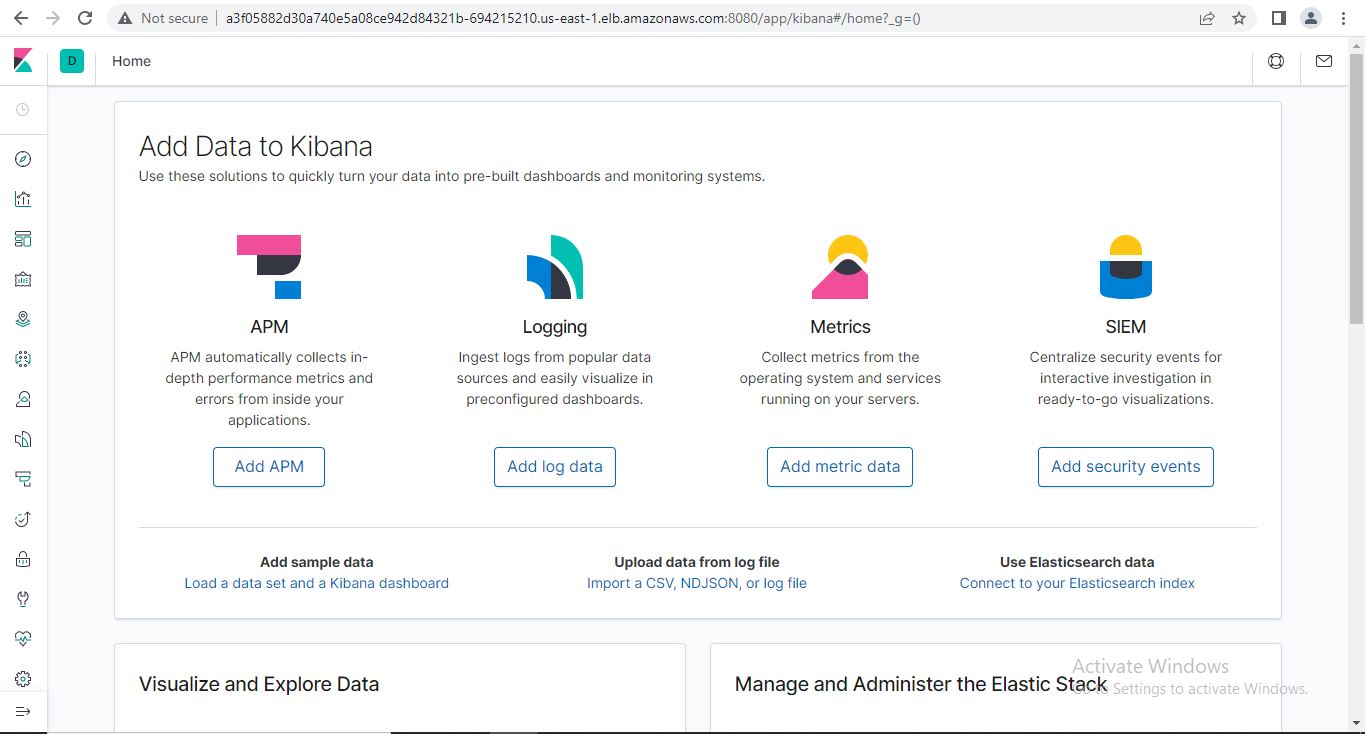
Kibana Dashboard

How to Build and Push Spring-boot docker image to AWS ECR and deployed to an ECS container using AWS CodePipeline

In this blog, we describe How to Build and Push the Spring-boot docker image to AWS ECR and deployed it to an ECS container using AWS CodePipeline. We will build a sample spring-boot Application, push the image to AWS ECR and then deploy it to AWS ECS.

Prerequisites:

1. AWS Account

2. GitHub Account

Create an AWS ECR repository

Login to your AWS account and create an Amazon Elastic Container Registry repository with a name.

Create a cluster inside AWS ECS and select the cluster template as “Networking Only” because we use AWS FARGATE here.

Create a Task Definition

Select launch type as FARGATE, select task role as “ecsTaskExecutionRole”, Select your operating system, select Task memory and CPU, and Add container with container name and the image should be the ECR repository URI.

Create a service inside the cluster

Click on Clusters, then select our cluster, create a service with a service name, and select launch type as FARGATE.

Create a “buildspec.yml” file on the project repository

version: 0.2
phases:
pre_build:
commands:
- mvn clean install
- echo Logging in to Amazon ECR...
- aws --version
- $(aws ecr get-login --region $AWS_DEFAULT_REGION --no-include-email)
- REPOSITORY_URI=788155875213.dkr.ecr.us-east-2.amazonaws.com/demospringboot
- COMMIT_HASH=$(echo $CODEBUILD_RESOLVED_SOURCE_VERSION | cut -c 1-7)
- IMAGE_TAG=build-$(echo $CODEBUILD_BUILD_ID | awk -F":" '{print $2}')
build:
commands:
- echo Build started on `date`
- echo building the Jar file
- echo Building the Docker image...
- docker build -t $REPOSITORY_URI:latest .
- docker tag $REPOSITORY_URI:latest $REPOSITORY_URI:$IMAGE_TAG
post_build:
commands:
- echo Build completed on `date`
- echo Pushing the Docker images...
- docker push $REPOSITORY_URI:latest
- docker push $REPOSITORY_URI:$IMAGE_TAG
- echo Writing image definitions file...
- printf '[{"name":"spring-container","imageUri":"%s"}]' $REPOSITORY_URI:$IMAGE_TAG > imagedefinitions.json
- cat imagedefinitions.json
artifacts:
files:
- imagedefinitions.json
- target/spring-boot-ecs.ja

Edit pom.xml file and add the line <finalName>spring-boot-ecs</finalName>

It indicates that the name of the generated artifact will be spring-boot-ecs. This name is often used to create a JAR or WAR file, which can then be deployed to a server or container, such as Amazon Elastic Container Service (ECS), to run a Spring Boot application.

Create Dockerfile on the project repository

FROM openjdk:18-jdk-slim

EXPOSE 8080

ADD target/spring-boot-ecs.jar spring-boot-ecs.jar 

ENTRYPOINT ["java","-jar","/spring-boot-ecs.jar"]

Go to AWS CodePipeline and create a Pipeline

Click on create new pipeline → Enter the pipeline name → Next

Select source provider as GitHub → Connect to GitHub → Select the repository of our project → Select branch → Next

Select the build provider as AWS CodeBuild → Create a project with the project name, operating system and also tick the below field


Select the Deploy provider as AWS ECS → Select cluster name and service name.

Create Pipeline.

Click on the pipeline and we can see the process

Here the image is pushed into the AWS ECR repository and deployed this image into AWS ECS. After the deployment is completed move to the AWS service inside our cluster and click on the task we get a public IP, copy this IP, and search into a browser.

How to deploy a spring-boot Application into AWS ECS via GitHub Actions

This blog describes deploying a spring-boot Application into AWS ESC via GitHub Actions. We will build a sample spring-boot Application, push the image to AWS ECR and then deploy it to AWS ECS.

Prerequisites:
1. AWS Account
2. GitHub Account

Create an AWS ECR repository

Login to your AWS account and create an Amazon Elastic Container Registry repository with a name.

Create a cluster inside AWS ECS and select the cluster template as “Networking Only” because we use AWS FARGATE here.

Create a Task Definition

Select launch type as FARGATE, select task role as “ecsTaskExecutionRole”, Select your operating system, select Task memory and CPU, and Add container with container name and the image should be the ECR repository URI.

Create a service inside the cluster

Click on Clusters then select our cluster and create a service with a service name and select launch type as FARGATE.

Create a task-definition.json file on the Project repository

Go to the project repository, create a new file “task-definition.json” and the file content will get from ( Task Definition –> select your task –> click on the Task name –> Get a JSON file and copy the file content and paste it into the “task-definition.json” file.)

Create the workflow

Add a YAML file to your repository (/.github/workflows/filename.yml)

name: Build and Deploy to AWS

on:
  push:
    branches:
      - main

jobs:
  setup-build-publish-deploy:
    name: Setup, Build, Publish, and Deploy
    runs-on: ubuntu-latest

    steps:
      - name: Checkout Repository
        uses: actions/checkout@v2

      # Setup JDK 1.8
      - name: Set up JDK 1.8
        uses: actions/setup-java@v1
        with:
          java-version: 1.8
          server-id: github
          settings-path: ${{ github.workspace }}

      # Build 
      - name: Build and Test with Maven
        run: mvn -B package --file pom.xml

      # Configure AWS credentials
      - name: Configure AWS credentials
        uses: aws-actions/configure-aws-credentials@v1
        with:
          aws-access-key-id: ${{ secrets.AWS_ACCESS_KEY_ID }}
          aws-secret-access-key: ${{ secrets.AWS_SECRET_ACCESS_KEY }}
          aws-region: ap-south-1

      # Login to Amazon ECR
      - name: Login to Amazon ECR
        id: login-ecr
        uses: aws-actions/amazon-ecr-login@v1

      # Build, tag, and push image to Amazon ECR
      - name: Build, tag, and push image to Amazon ECR
        id: build-image
        env:
          ECR_REGISTRY: ${{ steps.login-ecr.outputs.registry }}
          ECR_REPOSITORY: springboot
          IMAGE_TAG: develop
        run: |
          docker build -t $ECR_REGISTRY/$ECR_REPOSITORY:$IMAGE_TAG .
          docker push $ECR_REGISTRY/$ECR_REPOSITORY:$IMAGE_TAG
          echo "::set-output name=image::$ECR_REGISTRY/$ECR_REPOSITORY:$IMAGE_TAG"
      # Push the new image ID in the Amazon ECS task definition
      - name: Push the new image ID in the Amazon ECS task definition
        id: task-def
        uses: aws-actions/amazon-ecs-render-task-definition@v1
        with:
          task-definition: task-definition.json
          container-name: springboot-container
          image: ${{ steps.build-image.outputs.image }}

      # Deploy Amazon ECS task definition
      - name: Deploy Amazon ECS task definition
        uses: aws-actions/amazon-ecs-deploy-task-definition@v1
        with:
          task-definition: ${{ steps.task-def.outputs.task-definition }}
          service: springboot-service
          cluster: springboot-cluster
          wait-for-service-stability: true

Edit the pom.xml file and add the line

It indicates that the name of the generated artifact will be spring-boot-ecs. This name is often used to create a JAR or WAR file, which can then be deployed to a server or container, such as Amazon Elastic Container Service (ECS), to run a Spring Boot application

Create a Dockerfile inside the project repository

FROM maven:3.8.5-openjdk-18-slim AS build

WORKDIR /usr/src/app

COPY . /usr/src/app

RUN mvn package 

FROM openjdk:18-jdk-slim

EXPOSE 80

ARG JAR_FILE=spring-boot-ecs.jar

WORKDIR /opt/app

COPY --from=build /usr/src/app/target/${JAR_FILE} /opt/app/

ENTRYPOINT ["java","-jar","spring-boot-ecs.jar"]

Then click on Action

Here the image is pushed into the AWS ECR repository and deployed this image into AWS ECS. After completing the deployment go to the AWS cluster, click on Task and get a public IP, copy this IP, and search into a browser.

Setting up LetsEncrypt SSL/TLS for a domain in MicroK8s

Prerequisites:

  1. Forward ports 80 & 443 to your server. Set up a domain name that point to your server.
  2. Ngnix Ingress Controller

Installing MicroK8s:

Here, we are using MicroK8s version 1.21 and for the letsencrypt SSL/TLS certificate we use a cert-manager.

To install MicroK8s,

snap install microk8s –classic –channel=1.21/stable

Now, enable the MicroK8s add-ons ‘dns’ and ‘ingress’.

sudo microk8s enable dns ingress


Deployment and Service file

A test webserver is created using an nginx image and a service is also associated with it. We are creating them in a namespace ‘dev’.

Create the namespace using the command,

microk8s kubectl create ns dev

Following is the deployment and service file ( webserver-depl-svc.yaml ).


apiVersion: apps/v1

kind: Deployment

metadata:

  name: webserver-depl

spec:

  selector:

    matchLabels:

      app: webserver-app

  template:

    metadata:

      labels:

        app: webserver-app

    spec:

      containers:

        – name: webserver-app

          image: nginx:1.8

apiVersion: v1

kind: Service

metadata:

  name: webserver-svc

spec:

  selector:

    app: webserver-app

  ports:

  – name: webserver-app

    protocol: TCP

    port: 80

    targetPort: 80


Apply the file using,

sudo microk8s kubectl apply -f webserver-depl-svc.yaml –n dev


Setting up an Nginx Ingress Controller

All the manifests used in this documentation are taken from the official Nginx community repo.

git clone https://github.com/Keyshelltechs/nginx-ingress-controller.git


Here is the one-liner to deploy all the objects.

microk8s kubectl apply -f https://raw.githubusercontent.com/kubernetes/ingress-nginx/controller-v1.1.1/deploy/static/provider/cloud/deploy.yaml


Install cert-manager

To install, cert-manager use the following command.

sudo microk8s kubectl apply -f https://github.com/jetstack/cert-manager/releases/download/v1.3.1/cert-manager.yaml


To check if the cert-manager is installed and running successfully,

sudo microk8s kubectl get pods -n=cert-manager ( You should see 3 pods running ).


Certificate Issuer config

Next, we have to create a certificate issuer config. Apply the following 2 yaml files for that.

letsencrypt-staging.yaml:


apiVersion: cert-manager.io/v1

kind: ClusterIssuer

metadata:

  name: letsencrypt-staging

spec:

  acme:

#change to your email

    email: youremail@gmail.com

    server: https://acme-staging-v02.api.letsencrypt.org/directory

    privateKeySecretRef:

      name: letsencrypt-staging

    solvers:

    – http01:

        ingress:

          class: public


letsencrypt-prod.yaml:


apiVersion: cert-manager.io/v1

kind: ClusterIssuer

metadata:

  name: letsencrypt-prod

spec:        

  acme:

    server: https://acme-v02.api.letsencrypt.org/directory

#change to your email

    email: youremail@gmail.com

    privateKeySecretRef:

       name: letsencrypt-prod

    solvers:

    – http01:

        ingress:

          class: public


Apply both files,

sudo microk8s kubectl apply -f letsencrypt-staging.yaml

sudo microk8s kubectl apply -f letsencrypt-prod.yaml


Create an ingress object

Create an ingress object to access our nginx welcome page using a DNS. An ingress object is nothing but a setup of routing rules. The ingress controller pod connects to the Ingress API to check for rules and it updates its nginx.conf accordingly.

To configure the ingress object, we use the following file ( ingress-routes.yaml ).

For the staging certificate, use the following ingress object.


apiVersion: networking.k8s.io/v1beta1

kind: Ingress

metadata:

  name: ingress-routes

  annotations:

    cert-manager.io/cluster-issuer: “letsencrypt-staging”

spec:

  tls:

  – hosts:

#change to your domain

    – yourdomain.com

    secretName: tls-secret

  rules:

#change to your domain

  – host: yourdomain.com

    http:

      paths:

        – path: /

        pathType: Prefix

        backend:

          service:

            name: webserver-svc

            port:

              number: 80


Apply it using,

sudo microk8s kubectl apply -f ingress-routes.yaml –n dev

sudo microk8s kubectl get certificate  ( Check if the state Ready=True)


Change the same ingress-routes.yaml file with the following content for production certificate.


apiVersion: networking.k8s.io/v1

kind: Ingress

metadata:

  name: ingress-routes

  annotations:

    cert-manager.io/cluster-issuer: “letsencrypt-prod”

spec:

  tls:

  – hosts:

#change to your domain

    – yourdomain.com

    secretName: tls-secret

  rules:

#change to your domain

  – host: yourdomain.com

    http:

      paths:

        – path: /

        pathType: Prefix

        backend:

          service:

            name: webserver-svc

            port:

              number: 80


Apply and check the state using,

sudo microk8s kubectl apply -f ingress-routes.yaml –n dev

sudo microk8s kubectl get certificate

To verify if the certificate was issued,

sudo microk8s kubectl describe certificate tls-secret


Now, visit your domain to check if the SSL/TLS has been enabled.


Any SSL certificate already purchased from an authority

You can use the same deployment and service file for this case. For the certificate, you have to generate a secret and pass it to the ingress object from where the ingress controller will take it.


To create the secret, go to the directory where the certificates are saved or mention the absolute path to the files in the command,

microk8s kubectl create secret tls hello-app-tls –namespace dev –key server.key –cert server.cert

Now, you can use the following ingress-routes.yaml file and apply it.


apiVersion: networking.k8s.io/v1

kind: Ingress

metadata:

  name: ingress-routes

  namespace: dev

spec:

  ingressClassName: nginx

  tls:

  – hosts:

#change to your domain

    – yourdomain.com

    secretName: hello-app-tls

  rules:

#change to your domain

  – host: ” yourdomain.com “

    http:

      paths:

        – pathType: Prefix

          path: “/”

          backend:

            service:

              name: webserver-svc

              port:

                number: 80


sudo microk8s kubectl apply -f ingress-routes.yaml

If needed you can forcefully apply the deployment file using,

sudo microk8s kubectl apply –f  webserver-depl-svc.yaml –force


Access the domain in browser and check if the certificate is applied.

How to Integrate Google Cloud Build with JFrog Artifactory

In this blog we describe how to Integrate Google Cloud Build with Jfrog Artifactory.We will build a sample containerized application that pulls dependencies from Artifactory, with Maven and Java as our sample package and language.

JFrog is a software company that provides a platform for managing and distributing software artifacts. The company’s main product, JFrog Artifactory, is a universal artifact repository that supports all major packaging formats, including Docker, Maven, npm, and NuGet. JFrog also offers other tools such as JFrog Xray and JFrog Mission Control for managing and monitoring software artifacts across an organization.

What is an Artifact ?
An artifact is a by-product of software development. It’s anything that is created so a piece of software can be developed. This might include things like data models, diagrams, setup scripts etc.

“Artifact” is a pretty broad term when it comes to software development. Most pieces of software have a lot of artifacts that are necessary for them to run. Some artifacts explain how a piece of software is supposed to work, while others actually allow that program to run.

Artifacts are important to hold onto throughout the development process of any piece of software, and even long after.

Without each and every artifact, it can make developing a piece of software much more difficult over time. This is especially true if development switches hands. When a new developer is put on a project, one of the first things they’ll want to do is go through the artifacts to get an idea of how the software works.

If an artifact is missing, that leaves a developer in the dark. This is why most artifacts are kept in a repository. This lets relevant developers access the artifacts at any time, all from one place.

What is Artifactory ?

Artifactory is Jfrog’s tool which acts as an artifact repository.It’s a place to store all your Binaries,Builds & Metadata.

Prerequisites:
Google Cloud Account : Should Enable Google Cloud Build

JFrog Account :We used 30 days trial from Google Cloud’s MarketPlace (https://console.cloud.google.com/marketplace/product/jfrog/jfrog-pro-team-saas)

First,Let’s Install and Setup Google Cloud CLI.We are using Ubuntu 20.04 LTS (Debian).You can skip this step if you have source code in Google Cloud Shell and edit using Google Cloud Editor.

1)To download the Linux 64-bit archive file, at the command line, run:

$ curl -O https://dl.google.com/dl/cloudsdk/channels/rapid/downloads/google-cloud-cli-413.0.0-linux-x86_64.tar.gz

2)Extract the contents of the file to any location on your file system (preferably your Home directory)

$ tar -xf google-cloud-cli-413.0.0-linux-x86.tar.gz

3)Run the installation script from the root of the folder you extracted to using the following command:

$ ./google-cloud-sdk/install.sh

4)To initialize the gcloud CLI, run:

$ ./google-cloud-sdk/bin/gcloud init

5)After initialize,add to path :

$ export PATH=$PATH:/home/user/google-cloud-sdk/bin

After this we can run gcloud CLI commands directly.
Eg : $ gcloud info

For reference for setting up Google Cloud CLI refer : https://cloud.google.com/sdk/docs/install-sdk#linux

Next,we can clone the source code from github.

$ git clone https://github.com/Keyshelltechs/Keyshell_Jfrog.git

Folder Structure : 

📁examples

📃DockerFile

📃cloudbuild.yaml

First we have to build a Maven Image that includes JFrog CLI. For that we can use cloudbuild.yaml and DockerFile.

Snippet of cloudbuild.yaml

- name: 'gcr.io/cloud-builders/docker'
  args:
  - 'build'
  - '--build-arg=BASE_IMAGE=gcr.io/cloud-builders/mvn:3.5.0-jdk-8'  
  - '--tag=gcr.io/$PROJECT_ID/java/jfrog:1.54.1'
  - '.'
  wait_for: ['-']

gcr.io/cloud-builders is a public container registry.
Here we use an image of Maven(mvn:3.5.0-jdk-8) from gcr.io/cloud-builders as base image to build Maven Image including JFrog CLI.You can see the image here.
DockerFile

ARG BASE_IMAGE=gcr.io/${PROJECT_ID}/mvn:3.5.0-jdk-8
FROM ${BASE_IMAGE}

ARG JFROG_CLI_VERSION=1.54.1

# PR submitted to download versioned JFrog CLI

RUN apt-get update -qqy && apt-get install -qqy curl \
  && cd /tmp \
  && curl -fL https://getcli.jfrog.io | sh \
  && mv jfrog /usr/bin/ \
  && apt-get remove -qqy --purge curl \
  && rm /var/lib/apt/lists/*_*

ENTRYPOINT ["jfrog"]

Here we use this DockerFile to build the final image by adding JFrog CLI to the base image.

So the final image will be tagged as gcr.io/$PROJECT_ID/java/jfrog:1.54.1

Now let’s build this image using Google Cloud Shell/Google Cloud CLI.

To build using Google Cloud Shell use this command :

$ gcloud builds submit –config=cloudbuild.yaml –project=your_google_project_id .

To build using Google Cloud CLI use this command :

$ gcloud builds submit –config=cloudbuild.yaml .

If the build is successful we can view the image in your GCP’s container registry.

Container Registry > Images > Java > JFrog

To check build results navigate to Cloud Build > History

Now we have built a Maven Image that includes JFrog CLI.We have to configure it to point it to Jfrog Artifactory.

For that first we have to create a Virtual Snapshot Repository and a Virtual Release Repository in Jfrog.

For creating these we have to login to our Jfrog Account.

After Logging in, let’s take a look on how we can create a Virtual Release Repository.

For creating a Virtual Repository , first we have to create a local and remote repository.

Before that let’s check what a local,remote and virtual repository is.

Local Repository: In JFrog, a local repository is a repository that is stored on the same machine as the JFrog Artifactory instance. It functions as a cache of all the artifacts that have been downloaded from remote repositories, and as a target for deploying artifacts that have been built locally.The local repository allows for faster access to frequently used artifacts and can also be used to manage internal artifacts that should not be exposed to external systems.


Remote Repository: In JFrog, a remote repository is a repository that is stored on a different machine or in a different location than the JFrog Artifactory instance. It generally refers to external repositories from where the artifacts are downloaded. A remote repository can be located in a different Artifactory server, or it can be a repository hosted by a third-party provider, such as Maven Central or JCenter. Remote repositories provide a way to access external artifacts that are needed for a build, and to share artifacts that have been deployed to Artifactory with other teams or systems. When a client requests an artifact that is not present in any of its local repositories, Artifactory will check the remote repositories in the order they are defined in the system, and will download the artifact from the first repository that contains it.

Virtual Repository: In JFrog, a virtual repository is a virtual aggregation of multiple local, remote and other virtual repositories. It allows you to access all of your repositories as if they were a single, unified repository. This makes it easy to manage and access multiple repositories from a single URL, and it also allows you to easily switch between different sets of repositories depending on your needs.

For example, you can use a virtual repository to aggregate all of your local, remote and other virtual repositories into a single URL, and then use that URL as the repository in your build tool’s configuration. This allows you to switch between different sets of repositories without changing your build configuration. Additionally, it allows you to manage access and permissions for a group of repositories together, and also search for artifacts across all repositories in the virtual repository.


Virtual repositories can be very useful to organize your artifacts and make it easier to manage access and permissions for different projects, teams or environments.


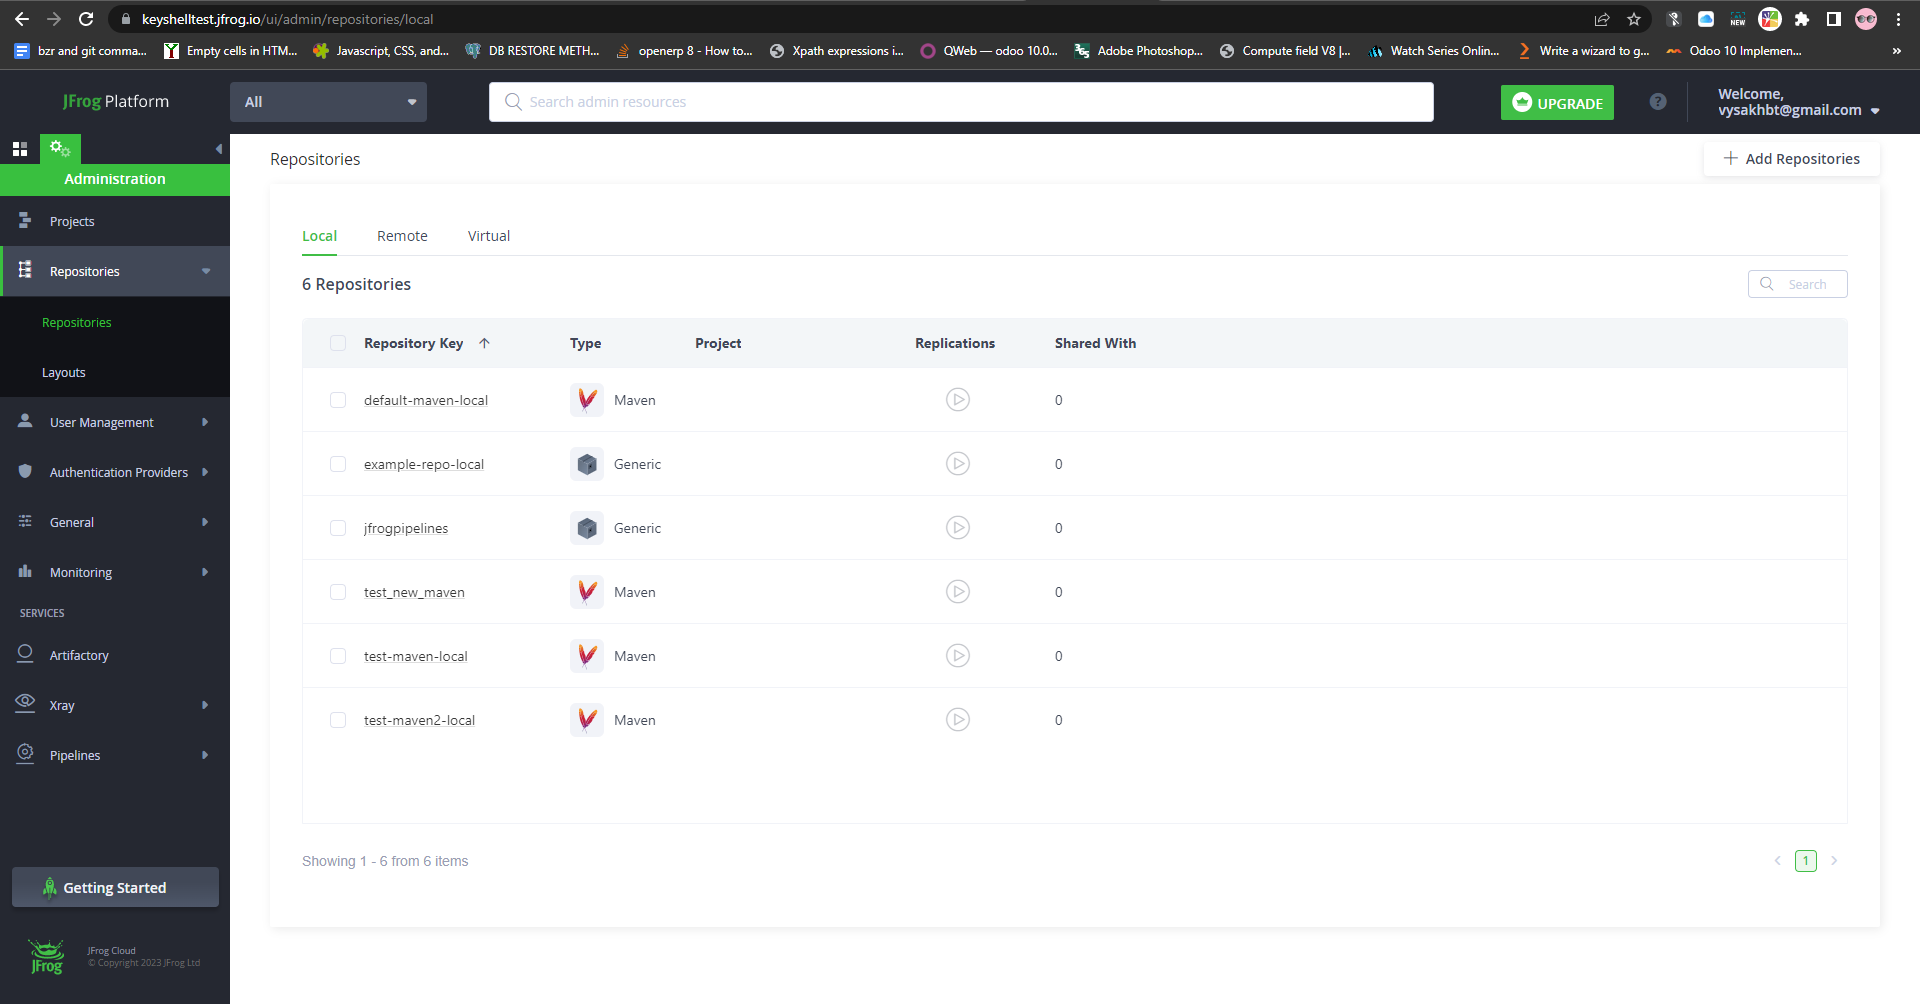
Now let’s create Local,Remote and Virtual Repository

To create Local Repository : 

Select Administration > Repositories > Repositories > Add Repositories > Local Repository

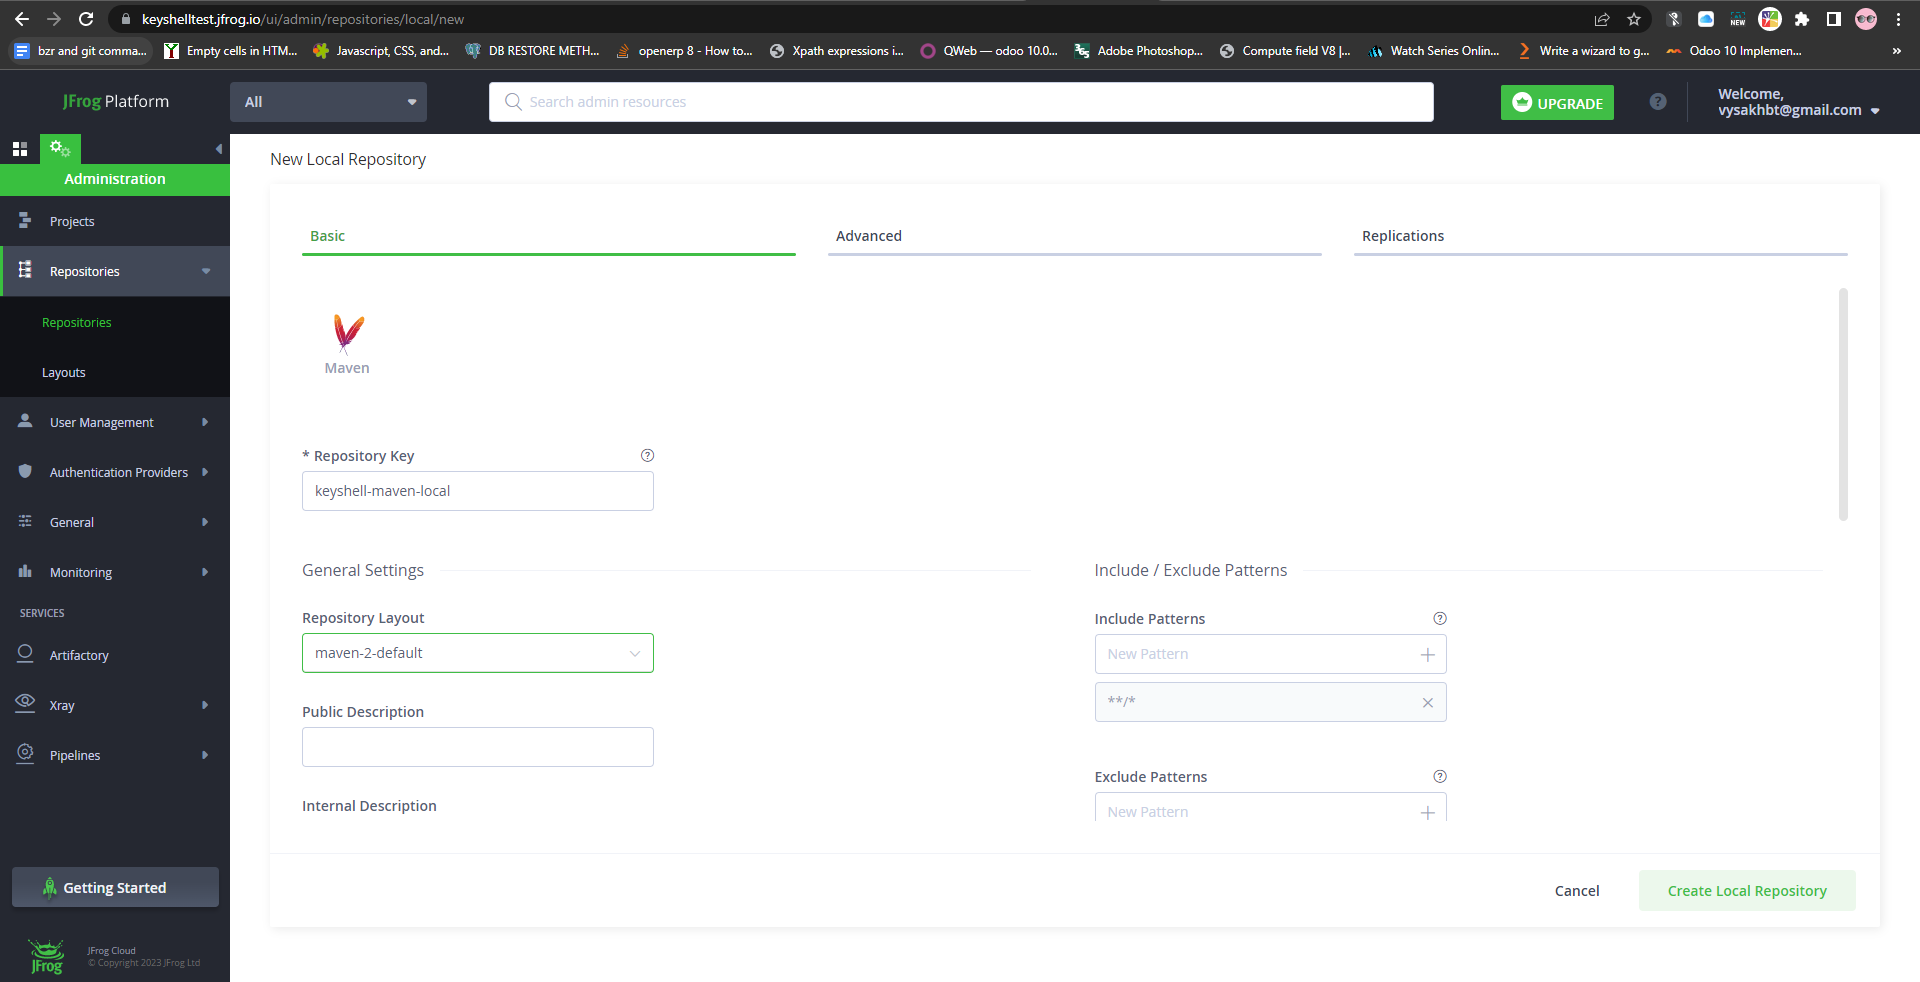
Then select “Maven” as Package Type.
 

Add “keyshell-maven-local” as Repository Key and click on “Create Local Repository”
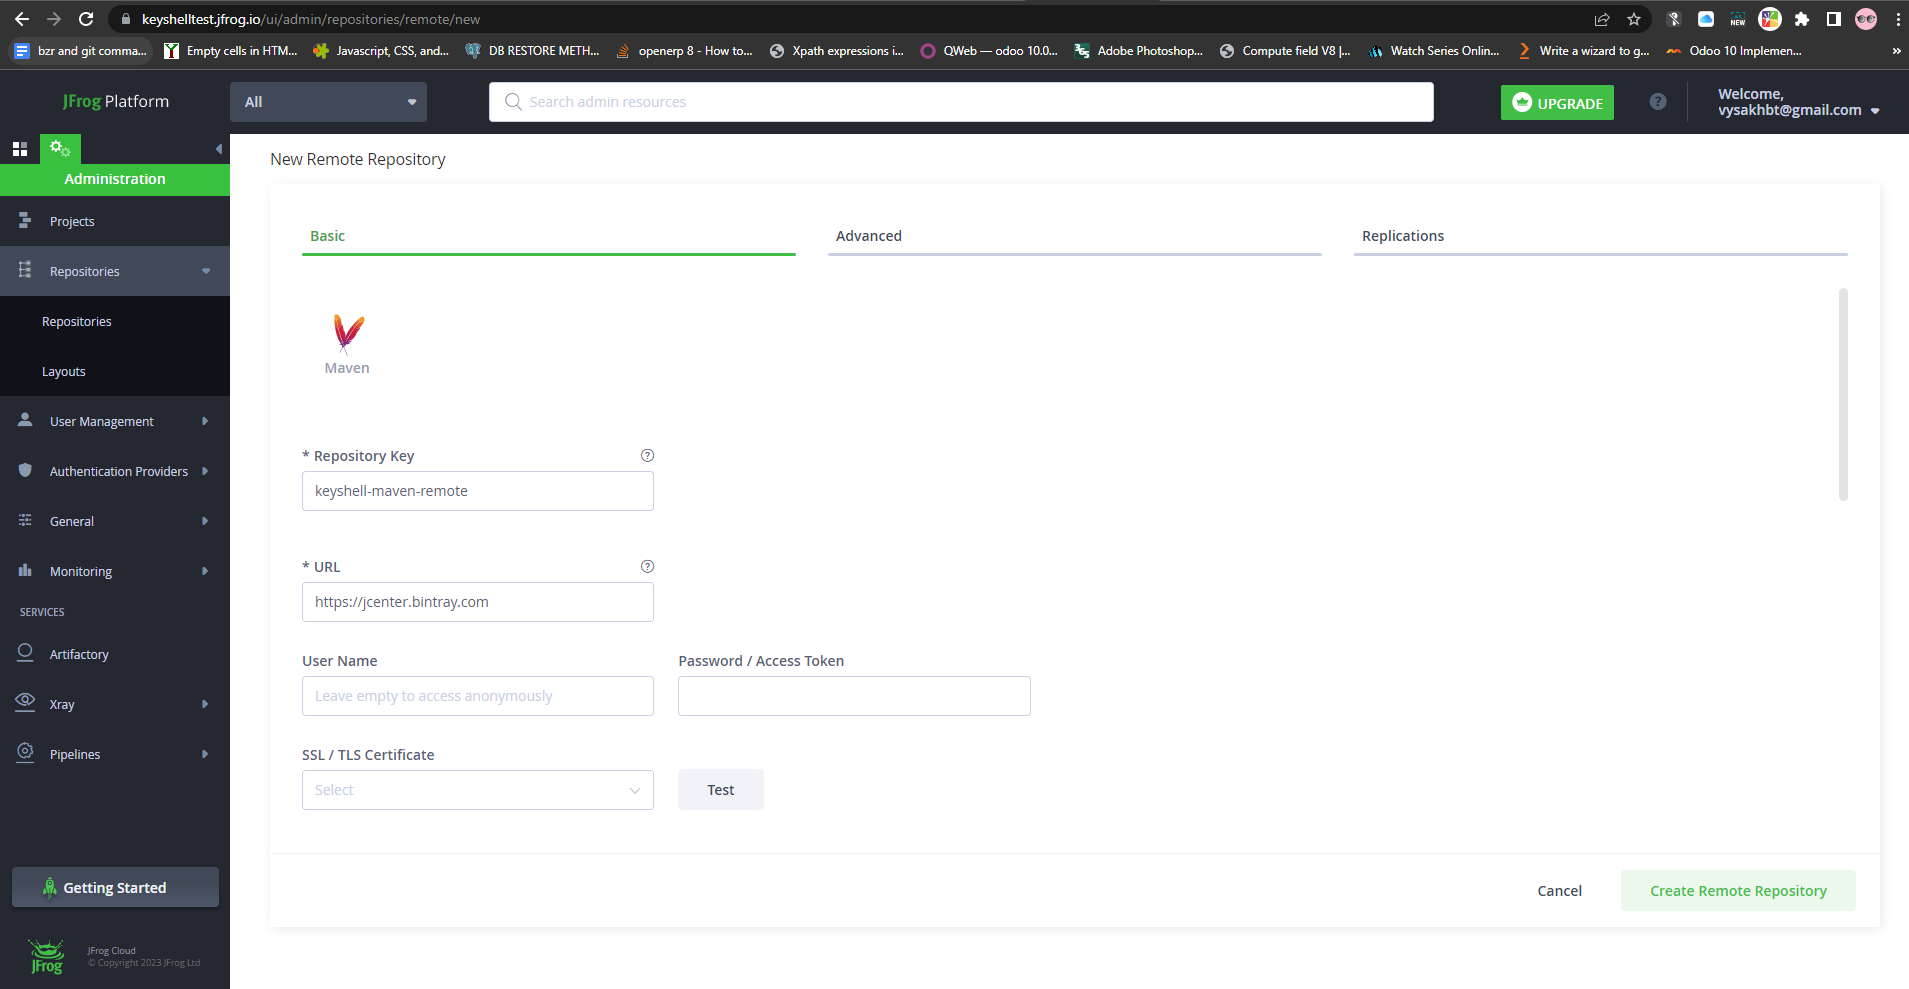
To create Remote Repository : 

Select Administration > Repositories > Repositories > Add Repositories > Remote Repository

Then select “Maven” as Package Type.

Add “keyshell-maven-remote” as Repository Key.

Add “https://jcenter.bintray.com” as URL. (JCenter is a public, Bintray-hosted repository that is used to store and distribute Java and Android libraries. JCenter is maintained by JFrog)

Now click on “Create Remote Repository”
To create Virtual Repository : 

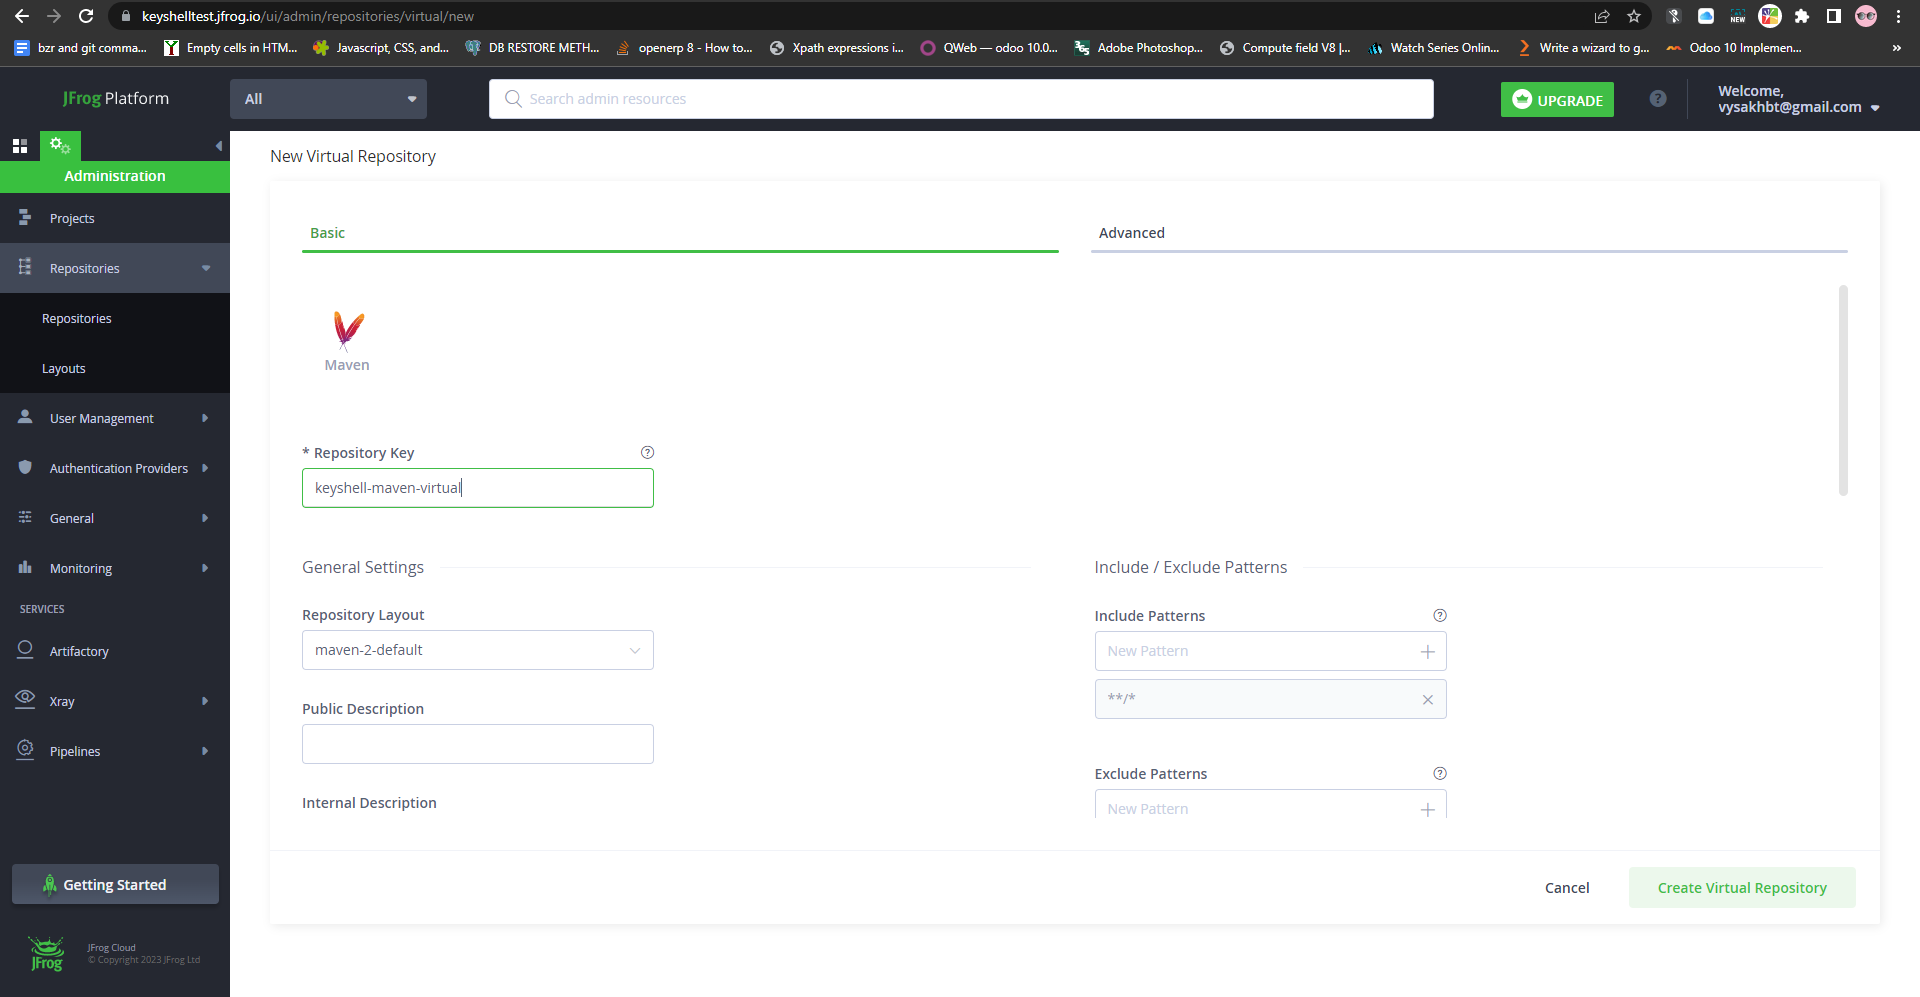
Select Administration > Repositories > Repositories > Add Repositories > Virtual Repository

Then select “Maven” as Package Type.

Add “keyshell-maven-virtual” as Repository Key.
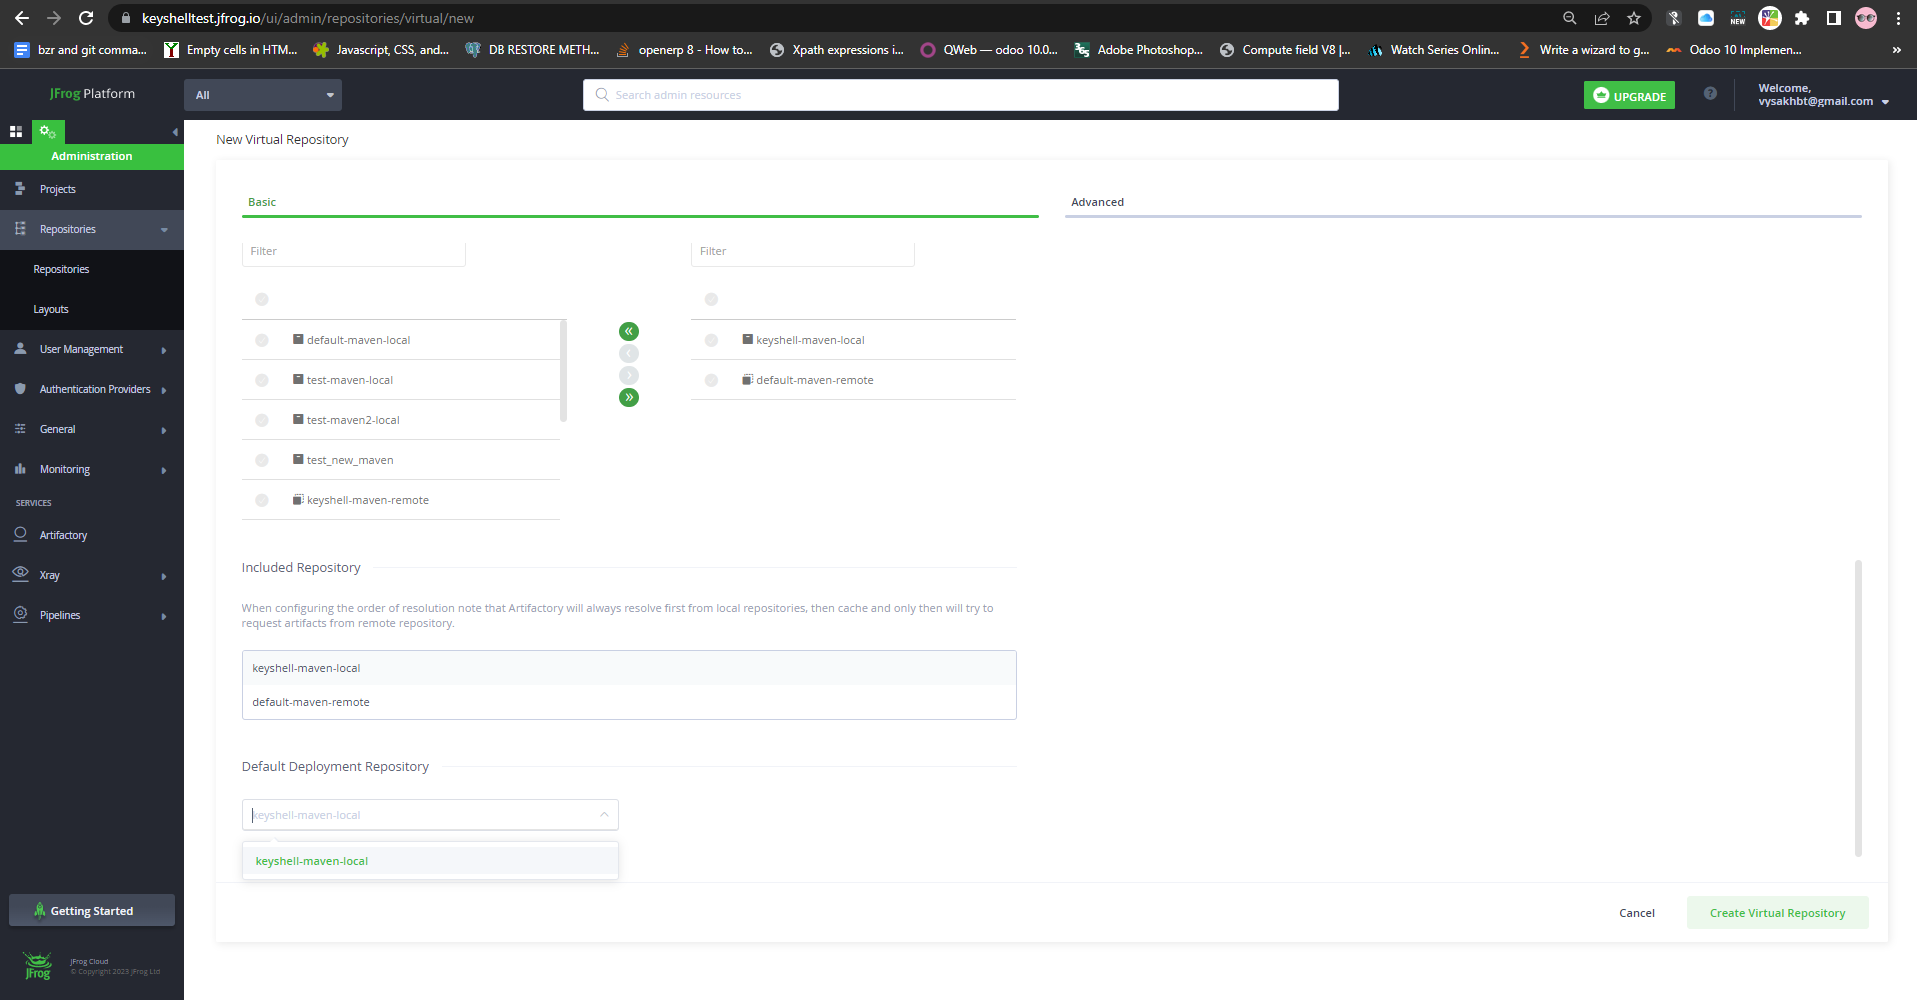
Here we have the option to select from our local,remote and other virtual repositories.

Now select “keyshell-maven-local” and “keyshell-maven-remote” from the list in the same order.

Also select “keyshell-maven-local” as Default Deployment Repository.

Now click on “Create Virtual Repository”.
Now we have created a Virtual Release Repository in Jfrog.Repeat the same steps to create Virtual Snapshot Repository.

Now let’s go inside our “examples” folder.
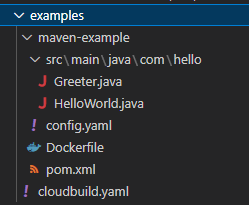
Here cloudbuild.yaml file is used to Configure JFrog CLI to point to JFrog Artifactory,Build a sample maven project and then containerize java app.

Snippet of cloudbuild.yaml

# Configure JFrog CLI to point to JFrog Artifactory

- name: 'docker.bintray.io/google-cloud-builder/java/jfrog:0.1'

  entrypoint: 'bash'

  args: ['-c', 'jfrog rt c rt-mvn-repo --url=https://[ARTIFACTORY-URL]/artifactory --user=[ARTIFACTORY-USER] --password=[ARTIFACTORY-PASSWORD OR ARTIFACTORY IDENTITY TOKEN]']

  dir: 'maven-example'

# Build a sample maven project

- name: 'gcr.io/$PROJECT_ID/java/jfrog'

  args: ['rt', 'mvn', "clean install", 'config.yaml', '--build-name=mybuild', '--build-number=$BUILD_ID']

  dir: 'maven-example'

# Containerize java app

- name: 'gcr.io/cloud-builders/docker'

  args:

  - 'build'

  - '--tag=gcr.io/$PROJECT_ID/java-app:${BUILD_ID}'

  - '.'

  dir: 'maven-example'

Here docker.bintray.io/google-cloud-builder/java/jfrog:0.1 is Jfrog Artifactory image which is used to Configure JFrog CLI to point to the JFrog Artifactory.

We have to update this cloudbuild.yaml with actual values of [ARTIFACTORY-USER], [ARTIFACTORY-URL] and [ARTIFACTORY-PASSWORD OR ARTIFACTORY IDENTITY TOKEN]

ARTIFACTORY IDENTITY TOKEN can be generated after logging to Jfrog.

(Click on the user button on top right corner > Edit Profile > Unlock > Generate Identity Token)


The files required to build a sample maven project is under the “maven-example” folder.We have to edit the “config.yaml” file in this directory.

config.yaml

version: 1

type: maven

resolver:

  snapshotRepo: keyshell-snapshot-virtual

  releaseRepo: keyshell-maven-virtual

  serverID: rt-mvn-repo

deployer:

  snapshotRepo: keyshell-snapshot-virtual

  releaseRepo: keyshell-maven-virtual

  serverID: rt-mvn-repo

Update the values of snapshotRepo and releaseRepo with the Jfrog’s virtual repositories which we have created earlier.

Dockerfile in this directory is used to containerize the java app.

pom.xml file is used in Apache Maven-based Java projects.It includes information such as the project’s dependencies on other libraries, the build plugins that should be used, and the project’s version number. This file is used by Maven to build and manage the project.

src directory contains the java program to display “Hello World”.

Now let’s build this cloudbuild.yaml (inside examples folder) using Google Cloud Shell/Google Cloud CLI.
To build using Google Cloud Shell use this command :

$ gcloud builds submit –config=cloudbuild.yaml –project=your_google_project_id .

To build using Google Cloud CLI use this command :

$ gcloud builds submit –config=cloudbuild.yaml .

If the build is successful we can view the image in your GCP’s container registry.

Container Registry > Images > java-app

To check build results navigate to Cloud Build > History

Once the app is containerized, it can be deployed on GKE or any other compute target.


We can view the Artifacts in Jfrog.

Application > Artifactory> Artifacts

Now we can run the containerized java app from GCP.

Container Registry > Images > java-app > Select Image > Show Pull Command

Let’s try running our container image in a cloud shell / VM .

For that we can use these docker commands.
To pull docker image of our containerized java app from the registry

$ docker pull your_image_name

To view the images

$docker images

To run the container

$docker run -it image_name
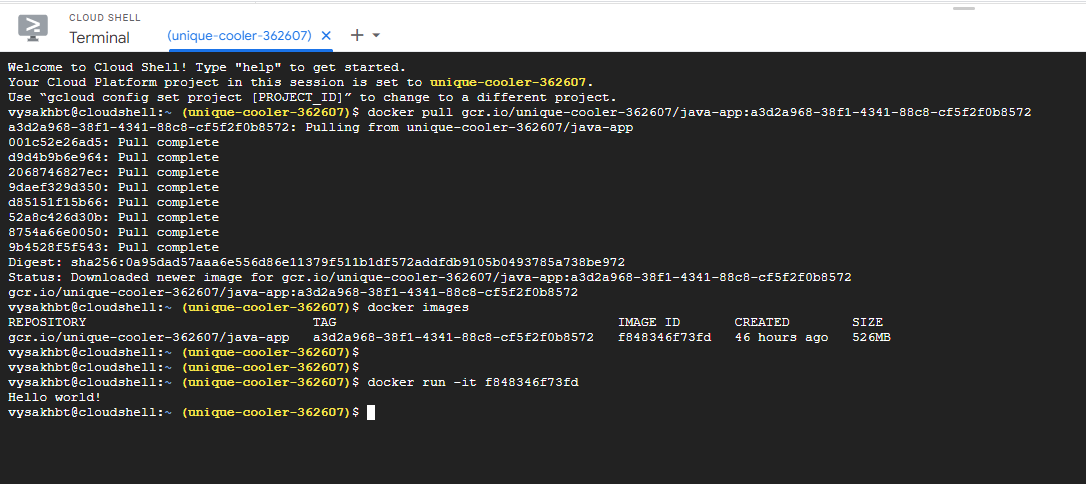
“Hello World!” is our expected output.

If you have any queries contact us at 📲 +91-81295 71359 or email us at support@keyshell.net